Announcement

Collapse
No announcement yet.

Pulleys Revisited

Collapse
X
 
  • Filter
  • Time
  • Show
Clear All
new posts

  • Pulleys Revisited

    Dusted off the Ralmark pulleys bought new back in 2003 and tried one on Tami T-Craft. Very smooth and tight (3") mounted in the forward right upper corner of the cockpit. It fits perfectly with a thin washer on each side, inside the bracket. With Terri T-Craft sitting right beside her, I decided to go look for her pulleys on the shelves of bins and boxes that came with her project.


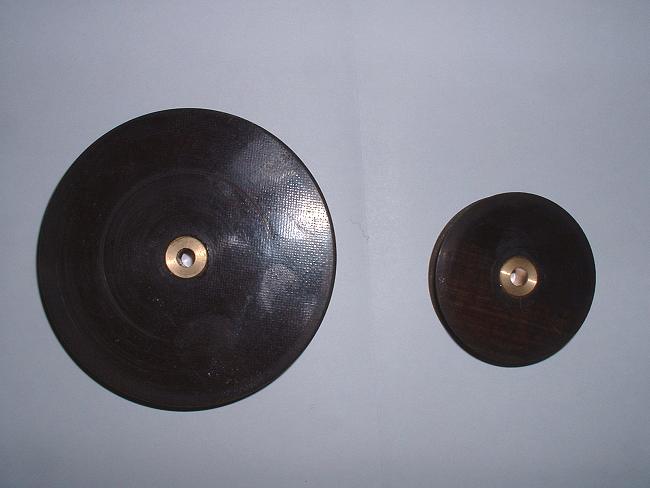
    I thought I was in luck when I found what appeared to be some ball bearing 1 3/4" pulleys, but they looked a little different...........


    Back in the workshop, side by side with the Ralmarks, they did indeed look different, and BIGGER! A mic on them showed them to be 2" exactly, and a test fit in the tail area elevator bracket proved they were not even close to fitting. So, obviously these were someone's attempt to find the correct 1 3/4" ball bearing pulleys, but they failed (and maybe didn't even realize it)!


    I have been playing the game "Name That Part" a lot with the new project, and sometimes win and sometimes loose............. seems there are quite a few unrecognizable Piper parts bagged/boxed up with Terri's project. At some point I will round them all up and offer them to anyone interested who may need them for their Piper (or who would like to play "Name That Part" with me.)


    Good lesson learned here............. know what you have and what you need and don't assume anything. However, that leaves Terri without Ralmark pulleys. (Can't put ball bearings on one and not the other.)


    So, who has has success recently finding new pulleys, and from where?


    And, do Ralmarks need lubrication (and with what) or are they "permanently lubricated"? (WD40 seemed to help the 2" ones.......... but that may not be the best lube to use........)

    Click image for larger version

Name:	Ralmark 4228-1-4227-1.jpg
Views:	409
Size:	99.6 KB
ID:	186028Click image for larger version

Name:	Ralmark Pulleys-1.JPG
Views:	412
Size:	153.0 KB
ID:	186029Click image for larger version

Name:	Ralmark Fit.JPG
Views:	399
Size:	102.1 KB
ID:	186030Click image for larger version

Name:	Pulley Fail.JPG
Views:	398
Size:	108.6 KB
ID:	186031
    Thanks for the help.


    Cheers,

    Jon


    Attached Files
    "Captain Jon" Timlin
    '46 BC12-D N94952 Traci T-Craft
    '46 BC12-D N96301 Tami T-Craft (undergoing restoration)
    '51 Model 19 N6629N Terri T-Craft (undergoing restoration)

  • #2
    I bought mine through Classic Aero, LLC, the Luscombe Foundation. Obviously, Taylorcraft parts are a sideline for them, so they tend to restock infrequently and do occasionally run out. I just checked online and the pulleys show up on the website (see https://shop.classicaero.info/Taylor...Parts_c138.htm). I guess you'll just have to place an order and find out.
    Last edited by RainierView; 01-16-2020, 07:04.
    Brian Leverson
    '46 BC-12D/Model 19 (N96162)

    Comment


    • #3
      ball bearing pulleys are money well spent. I just sold a set that I had extra. Those 2" are MS spec pulleys
      N29787
      '41 BC12-65

      Comment


      • #4
        Back in 2003, when I was rebuilding my Taylorcraft here in the UK, I either didn't know about Ralmark pulleys (or more likely, couldn't afford them).

        I asked a friend if he could make new phosphor bronze bushes for them. Total cost: a pint at my local flying club.

        My comment on my rebuild site at the time was:

        "Existing control surface pulleys were serviceable, but needed re-bushing, since the original bushes had worn loose in the pulleys. Therefore pulley bore opened out and new phosphor-bronze bushes turned and press-fitted in. The bush rotates around the bolt, not the pulley rotating around the bush.
        Bush is slightly wider than pulley, so preventing the side of the pulley interfering with the bracket."


        Comment


        • #5
          Thanks Rob. I remember you discussing the new bushings. The ball bearing ones are just so nice, and will last me the rest of my life. I am ready to pay the price.........

          By the way, did you have all your cables and pulleys installed when you did your covering? Just seems so much easier to do now that everything is open. but if so, how did you keep them from getting paint all over them?

          I guess the same question for the instrument panel and wiring, or do people spend a lot of time upside down doing all that stuff after the cover job? Guess it wouldn't be too bad with the boot cowling not yet on............

          sorry for all the questions-----it's 3am........

          Cheers,
          "Captain Jon" Timlin
          '46 BC12-D N94952 Traci T-Craft
          '46 BC12-D N96301 Tami T-Craft (undergoing restoration)
          '51 Model 19 N6629N Terri T-Craft (undergoing restoration)

          Comment


          • #6
            masking tape, fit the wings, and control surfaces and rig the cables.
            N29787
            '41 BC12-65

            Comment


            • #7
              I find plastic sandwich bags are great for keeping paint off of internal parts. I have used from the snack ones up to the gallon size. Easy to pull out after painting with a set of long forceps.

              Hank

              The cheapest ones come out easiest, just get any parts that tear off. The really nice bags seem REALLY STRONG when they snag on something!

              Comment


              • #8
                Aluminum foil is also great for masking. Forms around things well and great for where you DO NOT want paint going through the mask. Just watch for tears and punctures.

                Hank

                Comment


                • #9
                  Originally posted by CaptainJon View Post

                  By the way, did you have all your cables and pulleys installed when you did your covering?
                  I did for the aft fuselage cables and for the wing cables. They don't need protecting, other than the loose ends that meet in the cockpit, as others suggest.

                  Comment


                  • #10
                    OK, got it! Good plan with the plastic bags and aluminium foil. I just was not looking forward to crawling into the tail to mount an elevator pulley and cotter the nut/bolt after covering. Body doesn't bend like it used to..........

                    Cheers,
                    "Captain Jon" Timlin
                    '46 BC12-D N94952 Traci T-Craft
                    '46 BC12-D N96301 Tami T-Craft (undergoing restoration)
                    '51 Model 19 N6629N Terri T-Craft (undergoing restoration)

                    Comment


                    • #11
                      Originally posted by Hank Jarrett View Post
                      Aluminum foil is also great for masking. Forms around things well and great for where you DO NOT want paint going through the mask. Just watch for tears and punctures.

                      Hank
                      Aluminium foil is also great for protecting wood surfaces that DON'T need bonding, when using resourcinol-type glues (such as Aerodux)
                      [but DO NOT use aluminium foil for protecting wood surfaces when using Aerolite!]

                      Here's an example of where I wrap clamping blocks with foil to stop them from sticking (using Aerodux resourcinol glue) (this is not a Taylorcraft, just a sample photo)

                      Click image for larger version

Name:	P1120151.jpg
Views:	404
Size:	93.5 KB
ID:	186076


                      Comment


                      • #12
                        Rob,

                        Haven't had too much experience with resorcinol other than making the new aileron spars several years ago and a powerboat when I was 18............ That will be next year probably when I get working on the wings....... This year's push is to getting both fuselages either ready for cover or actually covered. I think our brands over here are different too........... Terri came with a still unopened packaged set of cans for Cascophen from Aircraft Spruce, a resorcinol type glue, but I think it's past it's expiry date already....... So what is the difference between Aerodux and Aerolite?

                        Cheers,

                        "Captain Jon" Timlin
                        '46 BC12-D N94952 Traci T-Craft
                        '46 BC12-D N96301 Tami T-Craft (undergoing restoration)
                        '51 Model 19 N6629N Terri T-Craft (undergoing restoration)

                        Comment


                        • #13
                          Resorcinol is only good for 6 months, the powder expires. I posted pics of using a hydraulic press to do the gusset clamping
                          N29787
                          '41 BC12-65

                          Comment


                          • #14
                            Jon, you may be right about brands being different.

                            The resoucinol I use (Aerodux 500 adhesive and 501 hardener) is made up of two dark brown liquid parts which you mix before applying. It results in the brown glue-line you may well see between (for example) the laminations of wood props.

                            Aerolite is also a two-part process: a powder you mix with water to form a paste which is applied to one side of the joint, and a liquid (formic acid...think ants) which is applied to the other side. The resulting bond line is transparent.

                            Comment


                            • #15
                              The aerodeux is only available in Europe from what I have found, the other stuff is technically not even resorcinol, I had to wait 3 months to get unexpired product because the powder has such a short life. The stuff wicks has is equivalent but not technically resorcinol.
                              N29787
                              '41 BC12-65

                              Comment

                              Working...
                              X