 Tweet
Tweet
Looking for good condition control wheel shafts for Pretzel yokes. Does anyone reproduce these? Any leads help. Thanks
-
-
Re: Control Wheel Shaft
I suspect that no one does.
Did you check with Wag Aero and Univair?
I also suspect that you could very easily make a replacement yourself out of tubing.
Dave R -
Re: Control Wheel Shaft
Holes were not drilled the same on all wheels so you will need to index them and drill anyway. Might as well make new ones from steel tube.
The shafts were NICKEL plated around the war, NOT CHROME if you want original and you need to Hydrogen Embrittlement relieve if you don't want cracks from the bolt holes. Bake the tubes WITHING 30 MINUTES of removal from plating bath at 375* F (+-25*F) for 23 hours!
HankComment
-
Re: Control Wheel Shaft
I did mine with electroless nickle plating:
Unlike electroplating, the electroless process plates the tubes inside and out. Did a bunch of other parts too
Scott
CF-CLR Blog: http://c-fclr.blogspot.ca/Comment
-
Re: Control Wheel Shaft
I don't know how electroless stands up compared to tank plating but it is FAR better from a Hydrogen embritilement perspective. Batch plating also can save a lot of money. Nickel is not nearly as tough as chrome and it will wear thin where it rubs, but not for years. Make sure the phonelic block is really smooth where the shaft goes through.
HankComment
-
Re: Control Wheel Shaft
I just posted a whole list of the steps to rebuild a Pretzel Wheel but it looks like "the net" caught it and carried it away. Oh well, more detail than needed anyway.
Short version was take it all apart. Work your back side off getting the rusted bolts out of the hub and bead blast the cast hub. DON'T SAND BLAST IT! Remove the "rubber" coating on the "loop" and "spoke" and sand blast. Prime and paint the parts (shaft too if you don't want have a heart attack when the plating shop gives you a price quote).
Don't scrimp on the Pretzel ball. The new ones are worth it and make the whole thing look brand new. After painting the loop and spoke for corrosion I recovered mine with some LONG pieces of heat shrink. Leave plenty off the ends as it shrinks in length and diameter. I had to trim the ends back to the edge of the ball since the heat shrink was larger in diameter than the ball holes.
I have a negative of the logo for the button if needed but unfortunately the silk screen for it is long gone.
Remember that the shafts were hand drilled to the wheel and for the gear at the front. The holes have to be indexed so the wheels will be straight. You need to drill BEFORE you plate. Also the wheel shafts are NOT interchangeable from side to side and there is an index "button" to limit throw on the gear. Get it centered before you drill or forever be stuck with turning one direction.
Hank
I also carved the little fitting at the top of the spoke. I think I used a piece of scrap wood but once it is painted you can't tell what it is made of. I didn't remember to plate the little ring on the spoke, but a little "metalizer" model plane paint and you can't really tell.
The ones in the photo are for my 45 but I have more "nasty" parts to build some up. Mine looked like pure junk when I started and rebuilding one is a nice weekend project. With the plating I don't even want to know what i spent on mine. All I remember is bad chest pain and seeing long passed family members who told me to get my candy behind back and finish the project. ;-) Plating can be EXPENSIVE, but they look SO GOOD with the nickel plating on the shaft and the new Pretzel balls.
HankComment
-
Re: Control Wheel Shaft
Hank,
The kit from Sky Port has the new 'Taylorcraft' center logo for the pretzels. I don't remember how to disassemble the pretzel, if you remember you may want to cover that. I cannot remember if John includes the instructions for that, been too long ago.Cheers,
Marty
TF #596
1946 BC-12D N95258
Former owner of:
1946 BC-12D/N95275
1943 L-2B/N3113SComment
-
Re: Control Wheel Shaft
Pretty easy (unless there is corrosion on the fasteners). Just three screws into nuts buried in the front piece plastic. The screws went through the cast aluminum center piece. Just unscrew the machine screws and the two halves of the ball are loose. front face falls off and the back piece slides down the shaft. Unless of course yours is as rotten as many in which case it will fall apart like old egg shells.
Nice to hear they are including new buttons now! I got one of the early kits and had to restore and silk screen the logo again.
HankComment
-
Re: Control Wheel Shaft
Hank,
I was referring to the disassembly of the yoke, itself.Cheers,
Marty
TF #596
1946 BC-12D N95258
Former owner of:
1946 BC-12D/N95275
1943 L-2B/N3113SComment
-
Re: Control Wheel Shaft
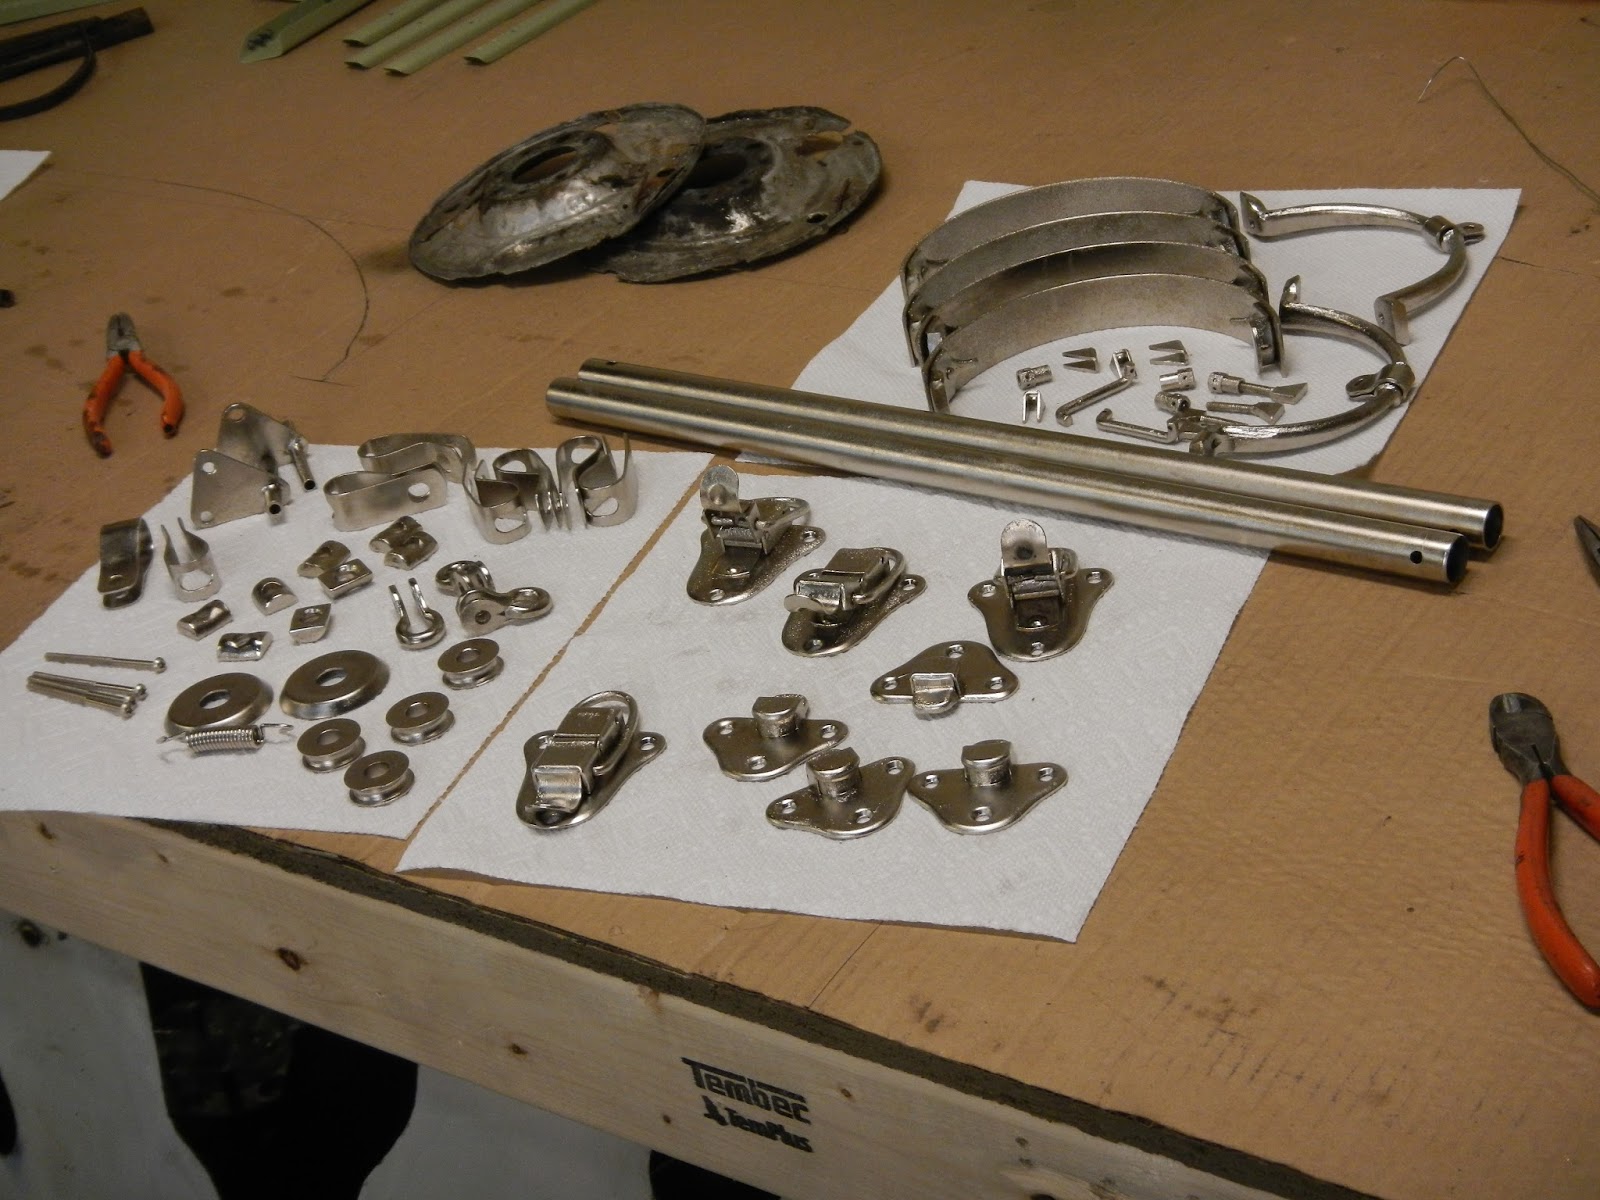
This is one of the nicer looking wheels I rebuilt. (YES, it is a "before" picture!) The aluminum hub is held together with 6 slot head machine screws and plain nuts. The screws are steel and the hub is aluminum so EXPECT them to be corroded in place. Teh front and rear halves will also have "corrosion welded" themselves together so you will need to use some spray penetrating oil, a LITTLE heat and some very thin edged in the gap to get them apart. A lot of the wheels I had had a LOT of damage from someone trying to wedge the halves apart with a screw driver. At least the Pretzel balls cover the damage. There is also a taper pin as I remember going through one of hte halves and the tube that has to be pressed out. Note teh red plastic piece at the top of the spoke. These usually shrink and split but are pretty easy to make. I don't even think I used my lathe. I just chucked the wood I used in a drill press and sanded a new one and painted it. Don't loose or forget the small Nickel plated ring at the top. I forgot to have mine plated and ended up using a modelers metalizer paint. I will plate them with the next batch of plating I get done.
I also remembered when I removed the plastic from the hoop part there were small screws in the forward face to make little finger bumps under the plastic. The screws were rusted pretty bad so I replaced them too.
HankComment
-
Re: Control Wheel Shaft
This is one of the nicer looking wheels I rebuilt. (YES, it is a "before" picture!) The aluminum hub is held together with 6 slot head machine screws and plain nuts. The screws are steel and the hub is aluminum so EXPECT them to be corroded in place. Teh front and rear halves will also have "corrosion welded" themselves together so you will need to use some spray penetrating oil, a LITTLE heat and some very thin edged in the gap to get them apart. A lot of the wheels I had had a LOT of damage from someone trying to wedge the halves apart with a screw driver. At least the Pretzel balls cover the damage. There is also a taper pin as I remember going through one of hte halves and the tube that has to be pressed out. Note teh red plastic piece at the top of the spoke. These usually shrink and split but are pretty easy to make. I don't even think I used my lathe. I just chucked the wood I used in a drill press and sanded a new one and painted it. Don't loose or forget the small Nickel plated ring at the top. I forgot to have mine plated and ended up using a modelers metalizer paint. I will plate them with the next batch of plating I get done.
I also remembered when I removed the plastic from the hoop part there were small screws in the forward face to make little finger bumps under the plastic. The screws were rusted pretty bad so I replaced them too.
HankAttached FilesComment
-
-
Re: Control Wheel Shaft
Hank,
My Sky Port kit had that small red piece at the top. I now remember the taper pin, that was interesting to disassemble.Cheers,
Marty
TF #596
1946 BC-12D N95258
Former owner of:
1946 BC-12D/N95275
1943 L-2B/N3113SComment
-
Re: Control Wheel Shaft
Here are the Sky Port pictures from the tech section.Attached FilesCheers,
Marty
TF #596
1946 BC-12D N95258
Former owner of:
1946 BC-12D/N95275
1943 L-2B/N3113SComment
-
-
Re: Control Wheel Shaft
Here are my yokes I re-did about six years ago.Attached FilesCheers,
Marty
TF #596
1946 BC-12D N95258
Former owner of:
1946 BC-12D/N95275
1943 L-2B/N3113SComment
-
-
Re: Control Wheel Shaft
They do look great with the new balls on them! My kits were very early on and I didn't get the little top piece with them.
HankComment
Comment